Velomobile development drawings: Part 4

In Part 1 of this write up I said the steering geometry is based on the invention of Jurgen Mages and his Python recumbents:-

http://en.openbike.org/wiki/Main_Page

There has been a great deal of discussion and argument about the best steering angles for any size wheel in any application of the bicycle, road racing, track, mountain bike, shopping bike. All have their subtle variations in angles and trail, all to do with where the tyre meets the ground and pivots. Then along comes Jurgen who places the steering head behind the wheel, does not attempt any of the known rules and it works.

What Jurgen discovered was that at a steering head angle of +/- 65 degrees as the steered wheel is turned the frame rises. The weight of the rider pushes back down stabilising the system.

I refer to Python Projects Survey  http://www.python-lowracer.de/projects.html   where I find the trail figure for a 20 inch wheel is +/- 140 mm and a steering pivot angle of 57.5 – 71 degrees. Now I know this is for two wheeled vehicles and I am designing a three wheeled vehicle but you have to start somewhere.

At this point in this project I have developed a simple idea. I have looked at wheel sizes, axles, airflow, body shape by profile stacking, rotation, and extrusion. I have enough toys to play with.

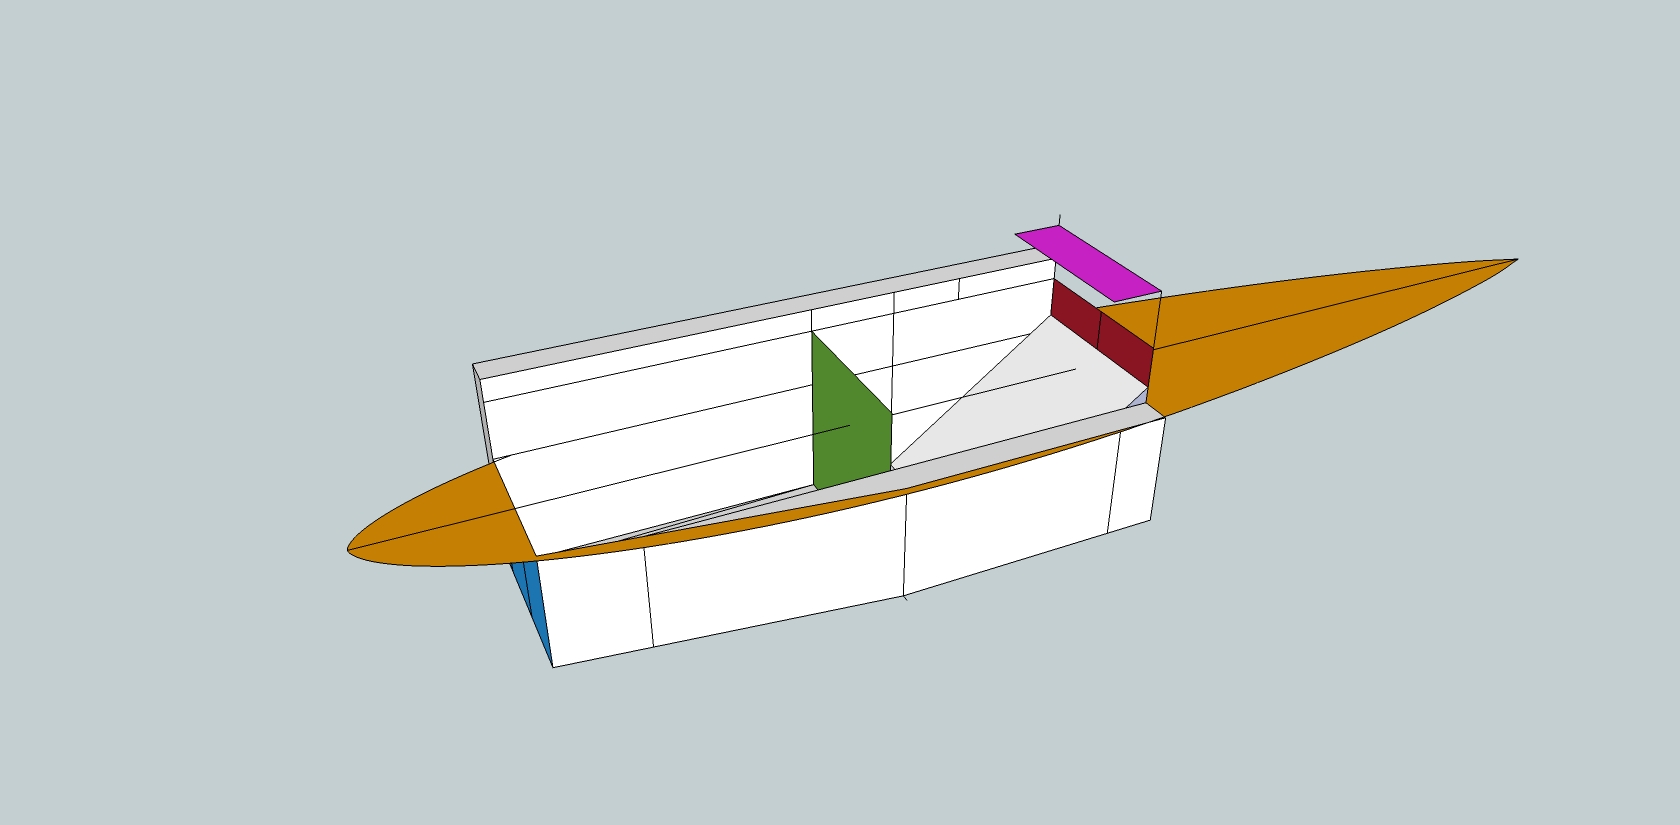
Now is the time to measure the movement in the body structure to give a reasonable turning radius. To do this I use the original Chassis Bounded Volume set up with 20 inch wheels. The file is smaller and takes less generating time. It also allows me to check I am not entering any clearance borders.
Importantly it will also show where a chassis will have to reach to tie it all in to a structure. I take the axle and wheels and add a rotation block with its axis at the point where the 65 degree steering angle meets the ground.

I then place a circle at the origin (the centre of the 3 axiis) and make it a Component. The axle, which is a separate Component is then placed with the trail point at the origin, and tilted forward. Both components are then made a Group. When the Group is tilted back so the axle is level the handling circle is now at 25 or 65 degrees. When the rotation tool is applied the handling circle the axle rotates at 65 degrees to the horizontal. I then position the axle to the correct point on the body and rotate the axle. Axle and body are now combined as a Group. When the Group is rotated to get the axle level the body leans away from the turning direction.

At this point, I reversed the direction of the steering pivot, everything else remains exactly the same. The body now leans into the turning direction. By the findings of Jurgen the geometry is self centering so to pull the body back upright release the steering.


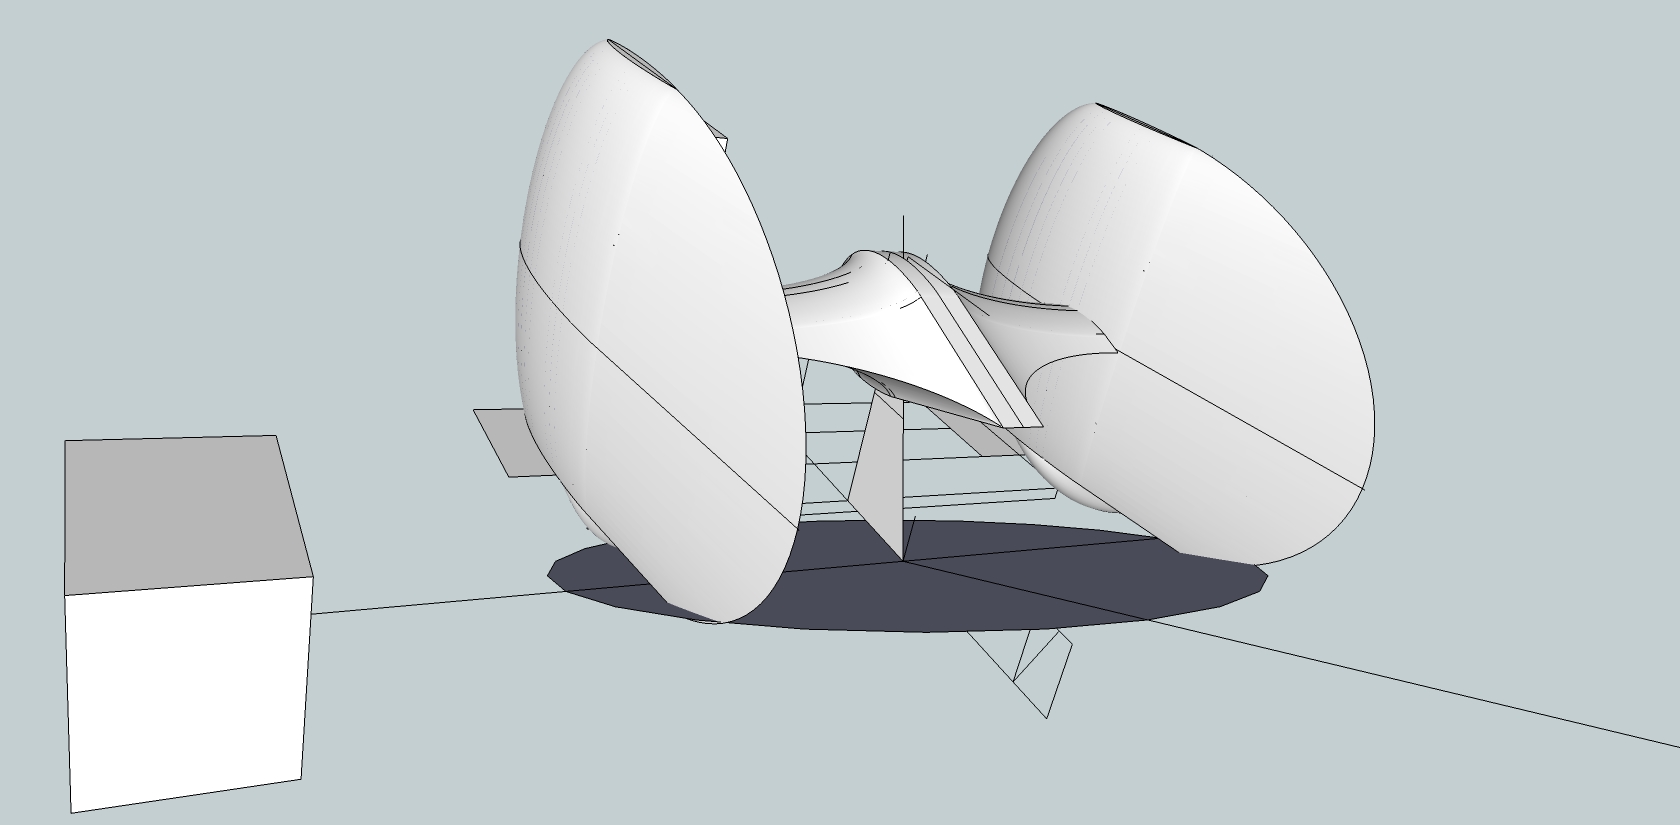
I repeated the process with the rendered body and the 26 inch wheels and straight axle to check for clearance, and this is what you get. I still have to carry on with the development of the one piece axle/nose and body bending design, but this is a good indication the geometry might work.

When I started out to design something I did not ‘see’ before, I did not expect this, but that is why you do it.

Velomobile development drawings: Part 3

In various drawings you will see blocks and cubes dotted around. These are for handling, they allow you to manipulate the component accurately, Sketchup rotation tools have a hard time handling curved surfaces.

Now I have a quick-and-dirty knock up drawing. some parts are accurately placed but nothing is fixed or final.

The only restriction I have placed on this design is that the maximum width is 800 mm, to go through a door in my apartment.

The first thing I checked for was the sight line, it was way too long.
So I redesigned the body with a straight line nose profile from just below the eyes and clearing the front axle.
It was so ungainly I am not allowing it out in public. Maybe the theory is sound but it does not always produce pleasing results as I found.
Maybe there is work to be done improving visibility without scaring people.

So I went back to body 1.
I had a 20 inch BMX wheel lying around while i was drawing. The smaller diameter rims have a hard time with the condition of the road and cycle track around here. I drew 26 inch 559 wheels and spats.
The increase in surface wetted area and cross sectional area is offset by the decrease in rolling resistance and tyre availability.

The down side of the larger wheels means the air flow between the spats and nose is becoming more restricted and looks like it will generate higher air pressure and therefore drag.
I act on niggles. I am not very smart and it takes time for things to sink in. Then they start to niggle at me, then I have to do something about it. The problem was always there, it is just exaggerated with larger spats.

The thing I tried was to increase the size of the axle fairing and placed so the air travels up the profile increasing in pressure. However when it goes over the hump on both fairing and spats the pressure will be negative by the time it hits the nose which has effectively pushed back.

Body 3.1 is the same but with an enclosed head fairing and a larger rear wheel spat, but this will cause grounding problems.

Body 3.2 Is another variation on the head fairing.

Body 4 gH2Ost Rerun:  is the beginning of thinking about the engineering of bending the body to steer the wheels.
I have lying about some 100 mm diameter Tumble Dryer hose, 25 mm compressed length stretches out to 120 mm, while retaining it’s circular form. I also have 80 mm hose.
I needed a semi circular cross section round about the trailing edge of the spats. At the same time I took the opportunity to split the body into two zones.
The upper section for the width of the arms and shoulders and the lower for the rib cage, hips and feet. I used E 817 for the upper profile, angling it in from the spats through clearance at the shoulders to the tail.
I went back to Loft Along Path and this time got it to work. This essentially the same system as ‘gH2Ost’ a tapered central flat section with circular rotated profiles on the edge. The air flow underneath needs more work. The air flow on top is improved and the overall shape is simplified.

With my new found success with LAP I went back to body 1 and rendered all the E 214 profiles.

Body 5. With the body 1 chunk I reversed the trike setup and put the spats at the back. This has the chance of excellent airflow well down the form. I can also reduce the overall width down to +/-600 mm.

Velomobile development drawings: Part 2

The next step was to measure the dimensions of the body I am aiming to transport.
I set up a board as seat back and surrounded myself with boxes for the rib cage/hips, shoulders, back of the head, eye line, leg bent and straight for knee height.
The bent knee height sets the velomobile body height which sets the eye line.

I then drew these up as Chassis Bounded Volume. It is NOT a chassis it is only the volumes and boundaries of a human body cycling lying down.
The light blue plane is the flat foot length.
The top edge of the green plane is the knee height and relative distance.
The dark red plane is the back of the shoulders and head The purple plane is the eye line height and distance of the eyes from the back of the head.
The yellow plane is Eppler 214 scaled to clearance fit at the shoulders at the dark red plane.

I then place a station at the red plane with 16 points where 8 X Eppler 214 profiles would pass for minimum clearance.
There is clearance below the Chassis Bounded Volume for sag in the hammock and the 150 mm (6 inch) ground clearance.
A 26 inch 559 rear wheel and the 20 inch 406 wheels, spats and inboard axle, were placed approximately in the right area.

An Eppler 817 hydrofoil profile was chosen because it is designed to work at low flow speeds and is rear loaded, that is its maximum height is well back on the chord line. This was scaled in the vertical plane, only to give a taut profile line to the nose of the body.

As with the front wheel spats the E214 were then laid on the profile line and then scaled to pass through the station. Whatever shape was generated would be exactly right, but I had no idea what it would look like! I thought the nose profile was irrelevant because the E214’s are stacked with no distortions between levels, aah, well, maybe.


Velomobile development drawings: Part 1

My aim in designing this new velomobile was to make it as simple as possible while reducing the effort to push it through the air. I also wanted to make something with as few compromises as possible.

The major influences at work in this design is the invention of Jurgen Mages and his Python recumbent bicycle geometry. This went completely against the RULES of bicycle steering geometry and created bikes which not only steer and handle but have done so over thousands of miles of commuting and touring. Please see in

http://en.openbike.org/wiki/Main_Page

One of the biggest sources of drag in a land traveling vehicles are the holes needed to clear the wheel(s) when they steer. Reduce the clearances to a minimum and you are doing as much as you can.

This image shows the plan view of a 20 inch 406 BMX front wheel. The aero profile is Eppler 214 Low Reynolds number which is calculated for low speed air flow. The ellipse is to give enough clearance for tyre punctures while not creating interference drag. The leading edge profile comes from the ellipse.
I could not imagine what this might look like, so I had to generate it to find out. This latest design completely changed my approach. Usually I draw what I want and then work on it until I am happy with the result. This time I set out the rules and see what comes about and worry about making it later.

The wheel does not pivot in the fairing, so pivot the fairing, this creates aero problems with the axle/fairing join. Simplify the whole front end and make the wheels, fairings and axle one piece. This does away with pivots, uprights, steering arms, rose joints and a mass of nuts bolts and washers.

“Nothing weighs less than nothing”

The next step was to put the disk brakes in-board. The axle then only had to deal with bending forces, all torsional braking forces are dealt with in the central structure leading directly into the chassis.

Make the nose of the body one piece with the axle and the messy aero join is avoided. Now bend the body to steer the wheels. So far I have come up with 3 ways in principle to do this.